Difference between revisions of "SLDS Error Details"
From wiki.vhub.us
Stevepeery (Talk | contribs) (→Selecting multiple students using provided IDs) |
Stevepeery (Talk | contribs) |
||
| Line 2: | Line 2: | ||
General things to know about using error details. | General things to know about using error details. | ||
| − | == Selecting multiple staff using provided | + | == Selecting multiple staff using provided numbers == |
| − | + | Teacher Numbers for staff are provided with the error information. | |
| + | # Select staff numbers by clicking the copy button: <div>[[File:Selecting_multiple_staff_using_provided_numbers_1.png]]</div> | ||
| + | # On the start page in PowerSchool, select Teacher Number and In and paste the teacher numbers in the search field: <div>[[File:Selecting_multiple_staff_using_provided_numbers_2.png]]</div> | ||
| − | == Selecting multiple students using provided | + | == Selecting multiple students using provided numbers == |
Student Numbers for students are provided with the error information on the Detail page. | Student Numbers for students are provided with the error information on the Detail page. | ||
| − | # Select student numbers by | + | # Select student numbers by clicking the copy button: <div>[[File:Selecting_multiple_students_using_provided_numbers_1]]</div> |
| − | # On the start page in PowerSchool, select Student Number and In and paste the student numbers in the search field: | + | # On the start page in PowerSchool, select Student Number and In and paste the student numbers in the search field: <div>[[File:Selecting_multiple_students_using_provided_numbers_2.png]]</div> |
== Editing student ADM history with Data Export Manager == | == Editing student ADM history with Data Export Manager == | ||
Revision as of 18:32, 25 May 2021
Contents
General
General things to know about using error details.
Selecting multiple staff using provided numbers
Teacher Numbers for staff are provided with the error information.
- Select staff numbers by clicking the copy button:

- On the start page in PowerSchool, select Teacher Number and In and paste the teacher numbers in the search field:


Selecting multiple students using provided numbers
Student Numbers for students are provided with the error information on the Detail page.
- Select student numbers by clicking the copy button:
- On the start page in PowerSchool, select Student Number and In and paste the student numbers in the search field:


Editing student ADM history with Data Export Manager
A student's ADM history cannot be edited on Start Page > Student Selection > Vermont AOE ADM Data History. To edit a student's history, follow these steps:
- Select just the student you want to edit.
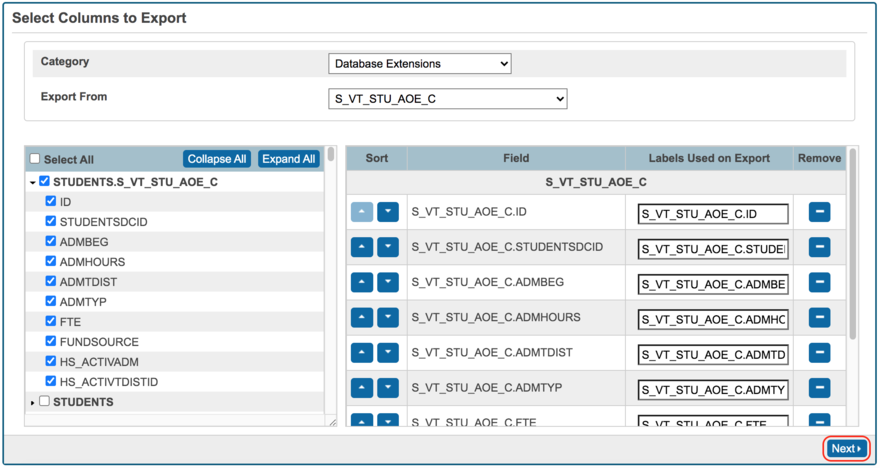
- Go to Start Page > System Administrator > Page and Data Management > Data Export Manager.
- Select this table and these columns and click the Next button:
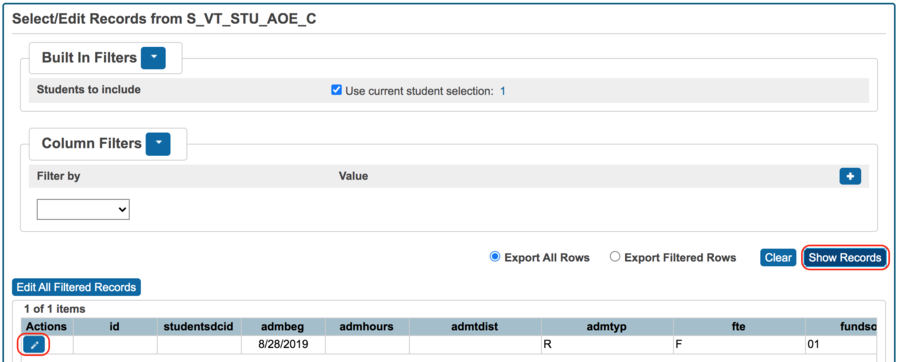
- Click the Show Records button and the pencil (edit) button:
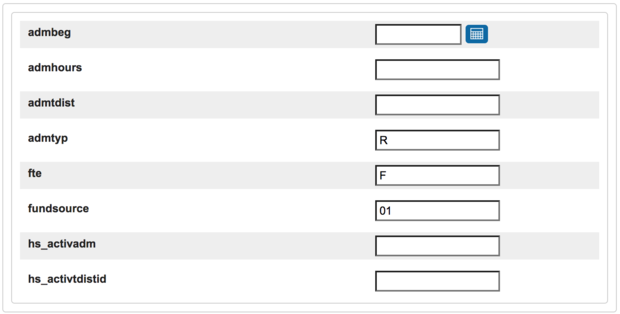
- Edit data on this screen:


Staff
Can only contain alphabet characters, spaces, and hyphens.
All names are limited to alphabet characters, spaces, and hyphens.
- Copy MultiSelect text.
- Go to PowerSchool.
- Select Staff.
Staff does not have a POS.
Every staff record must have at least one related Place of Service (POS) record.
- Select staff with MultiSelect.
- Go to Start Page > Staff > VT State Information > VT Place of Service.
- Enter information on this screen in PowerSchool:


Students
ADM Start Date - Enter correct date
ADM Start Date can't be blank.
- Select student(s) using provided Student Number(s).
- Click State/Province - VT link and AOE ADM Data tab to get to Start Page > Student Selection > Vermont AOE ADM Data.
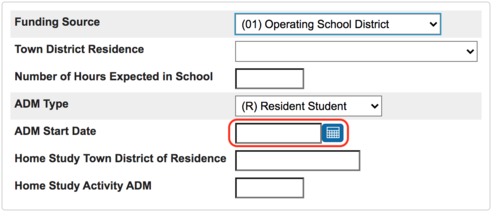
- If the current AOE ADM Data needs to be changed, click Edit Without Adding to History button.
- Set ADM Start Date here:
- If the current AOE ADM Data does not need to be changed, click AOE Census History link to bring up the student's ADM history.
- You can view the historic ADM Start Date(s) here, but you can not edit them.
- To edit an ADM history record, use the Data Export Manager.
- There must be an AOE ADM Data record with a start date that matches every enrollment date in Start Page > Student Selection > Transfer Information.
- Compare AOE ADM Data records to enrollment dates in Start Page > Student Selection > Transfer Information and make sure they all match.

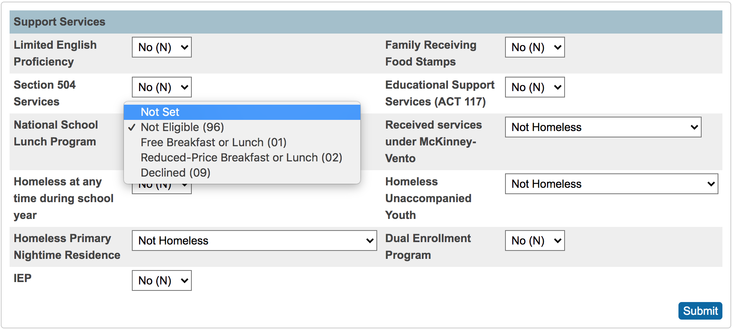
Elig for National School Lunch Prog - Value must not be null.
Elig for National School Lunch Prog can't be blank.
- Select student(s) using provided Student Number(s).
- Click State/Province - VT link and Support Services tab to get to Start Page > Student Selection > Vermont Support Services.
- Select National School Lunch Program from this popup:

Funding Source - Value must not be null.
Funding Source can't be blank.
- Select student(s) using provided Student Number(s).
- Click State/Province - VT link and AOE ADM Data tab to get to Start Page > Student Selection > Vermont AOE ADM Data.
- If the current AOE ADM Data has no funding source selected, click Edit Without Adding to History button.
- Select Funding Source from this popup:
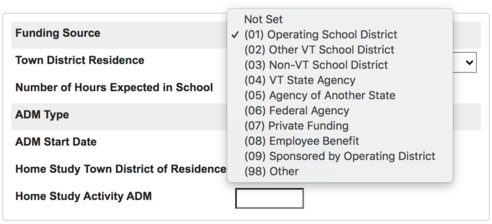
- If current AOE ADM Data does have a funding source selected, click AOE Census History link to bring up the student's ADM history.
- You can view the record that does not have a funding source, but you can not edit it here.
- To edit an ADM history record, use the Data Export Manager.

Courses
Code set for course character - Value must not be null.
Value must not be null.